On The Fly
September 2012
"Fly tying is a school from which we never graduate"
TYING NEWS
The Southern Oregon Fly Tyers invite you to attend their meetings the second Tuesday of
each month. The next meeting is September 11, 2012. The meetings start at 6:00 PM, at the Madrone Hill
Mobile Home Park community building near Gold Hill. Bring a friend, come early so you don't miss
anything, and stay late. Tyers need not be experienced, and those with all levels of skill are
welcome. Each meeting a member is encouraged to demonstrate a new or different skill, from simple
to difficult. For more information, call Dan Kellogg at 773-4724.
DIRECTIONS: Take Gold Hill Exit #40, off of I-5 and go west, toward Jacksonville, 1.3 miles, until you
reach the brick entrance way to the Madrone Hill Mobile Home Park on the right. You’ll pass a golf course
parking lot on your left shortly after leaving the freeway. After you turn right into the
mobile home park, proceed to the community building which is located about 100 yards ahead on the left. The
address is 8401 Old Stage Rd. Please park your vehicle on the bare dirt in the parking lot to avoid the
wooden septic covers in the grass
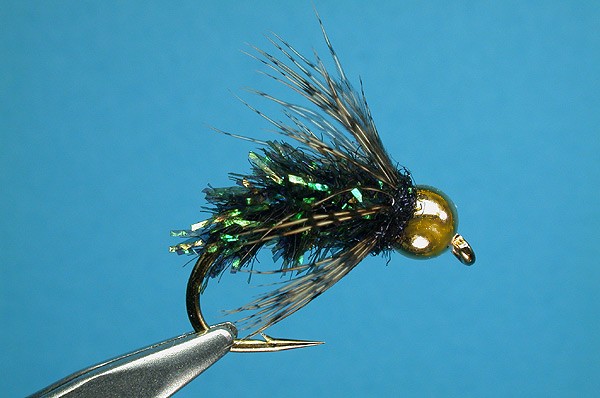
 PATTERN OF THE MONTH –Glimmer Bug
Hook: Daiichi 1120, heavy scud, size 6
Head: 3/16 gold bead.
Thread: 6-0 black
Weight: 6-8 wraps .035 lead
Body: Glimmer flash short or substitute.
Hackle: Brown partridge.
Collar: Black dubbing.
Tying Instructions:
Step 1: Mash the barb and mount the hook in the vise.
Step 2: Slide the gold bead onto the hook shank, small hole first.
Step 3: Take 6-8 wraps of lead wire around the hook shank, trim both tags, and slide the wraps forward into
the recess of the bead.
Step 4: Start the thread just behind the lead and lay down a thread base reward to the point halfway down
the bend, then forward and back over the lead wraps to bind them down securely. Make a thread ramp from the
shank to the lead for a smooth transition.
Step 5: Tie in the Glimmer Flash just behind the bead and bind it down on top of the shank rearward to the
end of the thread base. Wrap the flash material forward in touching turns to just behind the bead. Tie off
and trim excess.
Step 6: Select a brown partridge feather with barbs long enough to reach the bend of the hook. Prepare the
feather and tie on by the tip behind the bead. Wind the feather forward two turns, tie off and trim excess.
Step 7: Twist a small amount of black dubbing onto the thread and make a couple turns just in front of the
hackle to form a small collar.
Step 8: Whip finish and cement.
The Glimmer Bug was developed by the late Al Brunell of Corvallis, OR for steelhead on
the Rogue River. That alone is enough creditability to tie and fish this pattern with confidence. Al field
tested his flies first hand before he would ever put his name on them. This was one of his latest patterns
before his death. I suppose it could be called a caddis imitation, although who knows what the steelhead
takes it for. The bead and the lead will get it down in front of the fish, the flashy body material should
get their attention, and the soft hackle adds life and movement. Those of us who knew Al personally know
that his flies were as good as the person that invented them.
Tying Tips
There are many other body materials that can be substituted for the brand name Glimmer
Flash. You can use Estaz or Cactus Chenille just to name a few. These materials usually come in long or
short shuck and come in a nice variety of colors any of which can be effective. I have used the peacock
color on the fly pictured above. Use the short on this pattern. Be sure to stroke the fibers to the rear
on each half turn while winding the body material forward. This will prevent clumping and ensure and even
flowing body. The Glimmer Bug is as affective as it is easy to tie. The materials are easy to come by and
inexpensive. So tie some up, give them a test flight, and let me know how you do.
Tie One On,
Dan Kellogg
(you can contact me at FLYGUY@EZNORTHWEST.COM)
www.tyerstoolshop.com