On The Fly
"Fly tying is a school from which we never graduate"
TYING NEWS
The Southern Oregon Fly Tiers met Tuesday, September 11th at the Madrone Hill community building near Gold Hill. We encourage novice and experienced tiers alike to drop by the second Tuesday of each month for a fun evening. We have plenty of room for everyone. At our next meeting, Tuesday, October 9th , we will begin a monthly series of guest tiers in a tie-along format. If you are interested in this educational experience, let me know and we will add your name to our e-mail list. We can let you know who, when, and what materials to bring. Several members will be donating a dozen or more flies to the Steelhead Tournament raffle. I encourage all tiers to contribute their talents to this worthy club event.
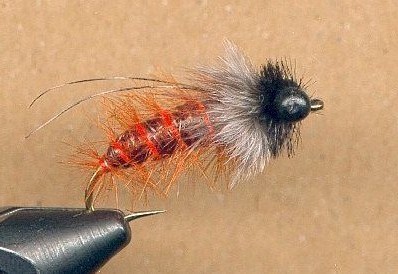
 PATTERN OF THE MONTH - October Caddis Nymph
Hook: Tiemco 200R or equivalent, size 10.
Weight: Lead wire.
Thread: 6/0 black.
Eyes: Black bead chain.
Rib: Orange Ostrich herl and fine, darkened copper wire.
Body: Clear wrap over orange synthetic dubbing.
Antenna: Two stripped grizzly hackle stems.
Collar: Soft gray body hackle.
Head: Black Ostrich herl.
Marking pen: Brown
Tying Instructions:
1) Start the thread two eye-widths back and wrap the thread to just
above the hook point. These are the end markers for the lead wire.
2) Wrap the lead wire on top of the thread base. Smooth out the tag ends
and tie down the wire with spiraling thread wraps ending at the front.
Coat this section with head cement or superglue.
3) Lay down a small thread base halfway forward towards the eye of the
hook. On top of this base you should tie in the bead chain eyes,
securing the eyes with figure-eight wraps of thread, then coat the
thread with cement.
4) Wrap the thread to the back of the lead wire, and at this point tie
in a herl of orange Ostrich plume that has been stripped on one side of
the stem. Tie in the copper ribbing wire.
5) Form a dubbing loop, insert the orange synthetic dubbing to form a
tapered body; twist the loop and wind it forward to just behind the
eyes, and secure the loop with thread wraps and trim the excess.
6) At this forward thread-position, tie in a strip of clear wrap, thin
skin or something similar. Wrap this material rearward over the dubbed
body in slightly overlapping turns. When you reach the back end, reverse
the wrap direction and wrap the material back to the tie in point and
secure the material with thread wraps. Trim the excess material.
7) Use a brown permanent marker to darken the wrap and the copper
ribbing wire.
8) Wrap the Ostrich herl forward in five even turns to form the rib,
making sure that you keep the fuzzy side up and the stem side down. Tie
off the Ostrich herl and trim. Counter wrap the copper wire forward five
turns over the herl, then tie off and trim.
9) Strip two grizzly hackles and tie these stems down, one on each side,
over the body of the fly. The stems should extend just past the end of
the hook.
10) Tie in the gray soft hackle, fold it and make 2-3 turns while
forcing the fibers into a sweptback position. Tie off the hackle and
trim the excess.
11) Finally, tie in a black Ostrich herl and wind it forward to the bead
eyes, then wind a figure-eight around the beads. Tie off the herl and
trim it just behind the hook eye. Whip-finish the thread and apply head
cement.
This version of an October Caddis Nymph was developed by Jason Aki from Ashland, Wisconsin. His passion for fly fishing and tying has taken him throughout the country as a guide and commercial tier. Northwest streams and rivers are known for their great October or Fall Caddis hatches. Later this month and into next, this hatch will hopefully happen again on the Rogue. The October Caddis hatch is characterized by its insects of large size having uniquely colored orange bodies, but unlike most caddis hatches, with clouds of adults hovering over the water, October Caddis emerge in smaller numbers typically near the shoreline. Fishing a proven dry fly imitation in and around vegetation or shady spots is the key to trigging a violent strike. If you want to increase your odds, Jason suggests running a nymph or pupa pattern suspended from the dry fly. In his opinion nothing works better for this technique than his October Caddis Nymph. It has an authentic buggy look and a soft texture to keep it in the fish’s mouth a little bit longer. So tie some up, give them a test flight, and let me know how you did.
TYING TIPS
Use of a thread base under the lead wire is essential.
Most of the body is attached to the lead wire and the body will turn
easily around the hook shank if the lead is not secured properly. The
thread adds traction to the wire shank and provides a porous surface for
adherence of the cement or glue. Because the real bug is good sized, be
sure to dub the body firm and generous. Use the brown marker heavily on
the topside of the body. More orange on the bottom will give a more
natural look.
Tie One On,
Dan Kellogg (you can contact me at FLYGUY@EZNORTHWEST.COM)