On The Fly
"Fly tying is a school from which we never graduate"
TYING NEWSOn Thursday, August 26th, the Southern Oregon Fly Tiers (SOFT) held their monthly meeting at the Rogue River Library. This was our first meeting held at the Rogue River Library and we are excited about this new location due to its proximity to both the RFF and SOFF fishing clubs. Our hope is to attract more tiers from the SOFF club and we look forward to more new members along with their patterns and knowledge. After a three-month layoff for shoulder surgery,Morris Fruitman from the SOFF club hopes to return to the SOFT meetings. Our meeting activities included preparing a dozen fall Favorite steelhead flies for donation to the RFF auction, a fly raffie, a tying demonstration and a fly exchange. So if you love to tie or would like to get started. please accept our invitation to attend our meeting the 4th Thursday of each month at 7 p.m. at the Rogue River Library, 412 E. Main St. in Rogue River. At the last RFF meeting Rusty Randall said it best: "The unselfish sharing of knowledge and skill has brought fly tying to the level it is today."
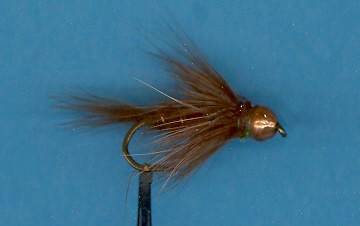
 PATTERN OF THE MONTH - Bead Head Big Bird
Hook: Daichi 1560 or equivalent. Size 8 - 12.
Bead: 3/16" Copper.
Thread: Brown 6/0.
Weight: .020" Large lead wire.
Tail: Natural brown partridge.
Body: Light brown synthetic dubbing
Rib: Fine gold wire or oval tinsel.
Body Hackle: Natural brown partridge.
thorax One or two turns of body dubbing.
Tying Instructions:
1)Insert the brass bead onto the hook and push it up against the eye. Tie on
the thread behind the lead and secure the lead with thread wraps forward and
back. Apply head cement or super glue to anchor the bead and the lead.
2)Lay down a good thread base back to just above the barb and tie in a
clump of partridge, 1/2 shank long, for the tail.
3)Tie on the ribbing material and pull it back out of the way. Form a
dubbing loop at this point, insert dubbing material, twist the loop and wrap
a nicely tapered body up to the head. Now wind four turns of ribbing over
the body.
4)Select a partridge plume just long enough to reach the length of the hook
(see fly illustration). Tie it in by the tip then fold and stroke the barbs
to the rear as you wind 2 -3 turns. Tie back on the hackle until the proper
angle is achieved.
5)Dub a little more body material directly onto the thread and make two
turns to form a thorax right behind the bead and in front of the hackle.
This will cover the thread wraps and give the fly a buggier look. Form a
whip finish and apply cement.
My first exposure to the Bead Head Big Bird was on a pontoon float trip down the Rogue River with Ron Metzger. As we progressed down the river on a beautiful fishing day we were looking forward to one particular favorite slot. As luck would have it "our" slot was occupied so we fished the area above hoping the angler would move on before disturbing the big fish we just knew were there. This angler knew it too and proceeded to catch five nice steelhead 24 inches or better within 30 minutes. When he fmished and was about to leave, he waved us over and showed us the successful pattern: a Bead Head Big Bird. He even gave each of us a copy to try and explained how to fish it. I tied up several in different shades of brown and caught my first good-sized steelhead a few weeks later. There are good reasons why,this pattern works consistently well under summer and fall conditions: the weight gets the fly down to the fish's holding zone; it's a great natural looking emerging caddis imitation; and it has that classic profile and partridge movement that triggers the strike. Give it a try and let me know how it works for you.
TYING TIPS - Thread Heads Again
Though simple in construction and function, thread heads
are, to many tiers, a plague. About thread heads much has been written, and
size and shape are always debated. I believe these issues are a matter of
style, but their function is a matter of necessity A bit of understanding
and planning can make thread heads manageable, even make them pleasant to
tie. And the result is a head that is neat and sound. Here are a few
suggestions that should help. 1) Plan ahead by always leaving space for the
head on the hook's shank. I leave a bare spot between the eye and the point
at which I start my thread. No materials get tied on in that bare spot,
leaving room for the thread head. 2) Spend the extra time to closely trim
the last materials, the ones near the hook's eye. Forming a thread head over
a bulky mess takes too much thread and too much time. 3) Draw everything
back from the eye to allow access for creating a head. 4) Addjust enough
head cement to saturate the threads and no more, otherwise the excess cement
flows back into the materials, darkening and freezing their movement.
Tie One On,
Dan Kellogg
(you can contact me at FLYGUY@EZNORTHWEST.COM)