On The Fly
"Fly tying is a school from which we never graduate"
TYING NEWS
The Southern Oregon Fly Tiers met Tuesday, May 13th at the Madrone Hill community building near Gold Hill. We continued our monthly series of guest tiers in a tie-along format. Our guest, Lee Wedberg, shared his killer stonefly pattern and the secret ingredients. For our June meeting we have scheduled Loren Black to demonstrate his CDC caddis emerger pattern. We encourage both novice and experienced tiers to drop by the second Tuesday of each month for a fun evening. There is plenty of room for everyone. If you are interested in this educational experience, contact me and we will add your name to our e-mail notification list. Then we can let you know who, when, and what materials you should bring.
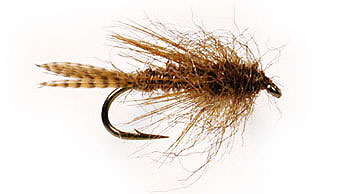
 PATTERN OF THE MONTH - Bird's Nest
Hook: Daiichi 1560 or equivalent, 1X long nymph hook, size 8-16.
Thread: Tan 8/0, or color to match body.
Tail: Wood duck flank feather barbs.
Rib: Fine gold or copper wire.
Abdomen: Australian Possum or rabbit dubbing in brown, gray or olive.
Legs: Wood duck flank feather.
Thorax: Same as abdomen.
Head: Thread.
Tying Instructions:
1) Start the thread one eye-width back from the eye. Lay down a thread base, stopping just above
the hook barb.
2) Select about 10-12 barbs from a wood duck feather and tie in the bunch just above the hook
barb. Bind down the butt ends along the hook shank. Tail length should be equal to the length of
the hook shank. Trim the butts and return the thread to the tail tie-in point.
3) Tie in the ribbing wire at the base of the tail and let it hang to the back.
4) Form a dubbing loop, insert the dubbing material, twist the loop, and wind it forward to form
a tapered abdomen covering 2/3 of the shank length. Tie-off and trim.
5) Wind the ribbing wire forward four even turns, then tie off and trim.
6) Select a wood duck flank feather, snip out the tip, remove the fluff and softer barbs at the
base of the stem until you have 10-12 barbs on each side. Hold the stem forward, concave side
down, and tie in the feather with two wraps only. Pull the feather forward by its stem through
the two wraps until the legs reach halfway back on the tail. Pull the legs down on each side and
bind them down with tighter wraps and trim.
7) Form another dubbing loop using the same dubbing as on the abdomen and form a thorax covering
1/3 of the shank length. Tie-off and trim.
8) Form a neat head, whip-finish and apply cement.
The Bird's Nest was designed by Cal Bird in 1984, tested on Hat Creek and
fished for trout on the Truckee River. Since that time this pattern has been a favorite nymph on
all western rivers and streams. All of Calís well known flies are generalist patterns, without
individual legs or precise structure that limits the fly to a single genus and species. Cal was
a trained artist, a calligrapher by trade, and his artistic skills with color and shape are
evident in all of his flies.
The original natural pattern was a precise blend of fur available at that
time. Abdomen and thorax consisted of 50% gray Australian Opossum, 40% hares mask, and 10% seal
fur. The rear of the fly was left naturally unruly, a combination of guard hairs and seal fur.
The thorax was combed out to increase the visible spike of hair and merge it with the wood duck
flank. The Birds Nest debuted in two flavors, natural and spectral. The Spectral Birds Nest was
pure art, using a combination of dubbing in all the primary and secondary colors on the color
wheel as a substitute for the 10% seal fur.
The Bird's Nest is one of the best ever all-around searching patterns. Fish it
dead drift in the film or along the bottom with a split shot to mimic a nymph. It can be fished
on the swing to imitate an ascending caddis pupae or stripped along the edges of weed beds to
simulate a nymph of baitfish. It is even more deadly when treated with a dry fly powder to make
it repel water and hold air bubbles like an ovipositing caddis.
TYING TIPS
Todayís tiers can substitute any coarse synthetic seal substitute or angora
goat for the original seal fur formula. The important part is for it to look buggy. This is best
accomplished using a dubbing loop and then picking out the guard hairs with a bodkin or dubbing
brush. Pre blended rabbit or hareís ear also can be used if you donít have the Opossum fur. just
be sure to pick it out. The method mentioned above to get the legs the proper length is very
useful for many other patterns using flank feathers or pheasant rump feathers that are too long
for smaller sizes.
This is a moderately easy pattern using common materials. So tie some up and
give them a test flight. Let me know how they work.
Tie One On,
Dan Kellogg (you can contact me at FLYGUY@EZNORTHWEST.COM)