On The Fly
"Fly tying is a school from which we never graduate"
TYING NEWS
The Southern Oregon Fly Tiers met Tuesday, June 10th at the Madrone Hill community building near Gold Hill. We continued our monthly series of guest tiers in a tie-along format. Our guest tier, Loren Black from Grants Pass, shared two of his CDC emerger fly patterns, made a great demonstration, and gave some one-on-one instruction. For our July meeting we have scheduled a material/tool, swap/sale/donation evening and a BBQ. If you’re a tier, this is a chance to pick up some real bargains. We encourage novice and experienced tiers alike to drop by the second Tuesday of each month at 6:30 p.m. for a fun evening. There is plenty of room for everyone. If you are interested in this educational experience, contact me and we will add your name to our e-mail notification list. Then we can let you know who, when, and what materials you should bring.
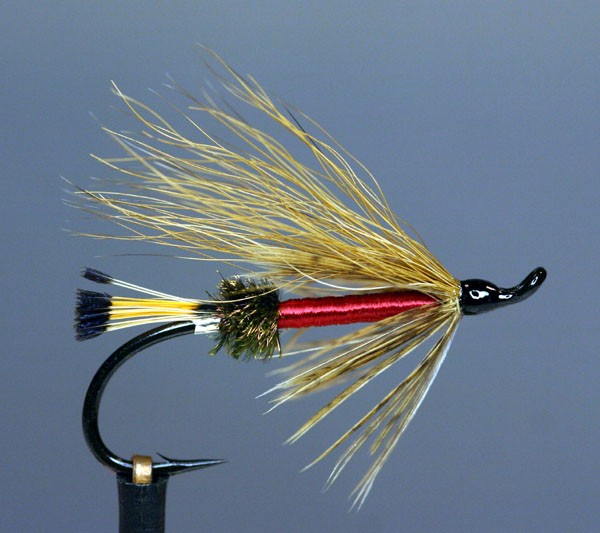
 PATTERN OF THE MONTH - Red Ant
Hook: Daiichi 2441 or equivalent, salmon/steelhead, size 2-8.
Thread: Black 6/0.
Tag: Medium-size silver flat tinsel.
Tail: Golden Pheasant tippets.
Butt: Peacock herl.
Body: Red floss.
Collar: Brown hackle.
Wing: Brown bucktail.
Head: Black thread.
Tying Instructions:
1) Start the thread one eye-width back from the eye. Lay down a smooth thread base, stopping
just above the hook point.
2) Tie in the tinsel, wrap it back 1/8 inch, then forward to the tinsel tie-in point. Tie-off
and trim.
3) Select about 20 barbs from a Golden Pheasant tippet, cut them off the stem, measure so they
reach the end of the hook bend, and tie them in at the base of the tag. Trim off the butts.
4) Tie-in 3-4 Peacock herls and wind them over the top of the hook shank, then wind the Peacock
herls around the tying thread four times in counterclockwise direction. Wind the Peacock herls
forward 1/3 the shank length. Tie-off and trim.
5) Tie-in the red floss just behind the eye, then wind it rearward to the base of the herl, then
wind it forward in touching wraps to the tie-in point. Tie-off and trim.
6) Select a brown hackle feather with barbs long enough to reach the herl butt. Tie-in the
feather by its tip and wind it three turns to form the collar. Tie back on the barbs to angle
them at 45 degrees. Trim excess material.
7) Select a small bunch of brown bucktail and even their tips by stacking. Measure them to reach
the end of the tail; trim to length and tie in the bucktail on top of the hook shank at a
45-degree angle.
8) Form a neat head, whip-finish and apply cement.
The Red Ant was created by Mike Kennedy and introduced in the 1940s. As a trout fly its origin dates back to the Isaac Walton era and a similar pattern by the same name. This steelhead version has proven to be indispensable on the Rogue as well as many other rivers late in the summer season. It is purposely-tied sleek, low-water style. The Red Ant could be described as somewhat drab and discreet, making this type of pattern effective in all types of water at any time of the year. Tied in smaller sizes, the Red Ant is a winner for half-pounders on the lower Rogue.
TYING TIPS
When you cut the tippet barbs away from the stem you allow each barb
to separate when tied on as the tail. Because Peacock herl is very fragile, when you twist it
around the thread before winding it you increase its durability dramatically. Keep the Red Ant
fly sleek (low-water style) by limiting the amount of hackle and wing materials that are tied
in. The Red Ant looks great and is fairly easy to tie. So give it a try, tie some up for the
coming season, give them a test flight and let me know how you do.
Tie One On,
Dan Kellogg (you can contact me at FLYGUY@EZNORTHWEST.COM)