On The Fly
July 2010
"Fly tying is a school from which we never graduate"
SOFT BBQ PICNIC POTLUCK ON TUESDAY, JULY 13, 2010, 5:00 PM
Southern Oregon Fly Tyers invite you to attend their BBQ Picnic Potluck, Tuesday, July 13, 2010, at 5:00
PM, at the Valley Of The Rogue State Park Day Use Area “A”. Let Dale Heath know if you need directions to
get to day use area “A”. deheath504@clearwire.net
We'll start gathering at 5:00 PM, and start eating at
6:00 PM. I'm sure John and/or Otis will be there to help with casting, before and after, so bring your
rods.
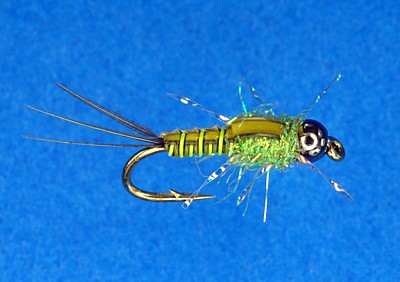
PATTERN OF THE MONTH - Morrish’s Pickpocket

Hook: Daiichi 1710, 2X long nymph, size 16-10
Thread: 8-0 to match.
Bead: gold, black or copper.
Weight: Lead wire, size to match hook.
Tail: 3-4 Pheasant tail fibers.
Abdomen: 2 different colors of BR size ultrawire.
Back: Goose biot to match one color of wire.
Thorax: Ice dubbing.
Legs: Midge flash
Wingcase: Same goose biot
Tying Instructions
Step 1 Mash the barb, place the bead on the hook, and mount the hook in the vise. Wrap 10-12 turns of lead
wire, trim, and slide the lead into the back of the bead.
Step 2: Start the thread behind the lead and secure the wraps to the hook shank with widely spiraled turns
ending just above the barb.
Step 3: Tie in the pheasant tail fibers for the tail and trim the butts.
Step 4: Tie in one of each of the two colored wires nest to each other.
Step 5: Build a slight taper with thread.
Step 6: Tie in the goose biot by the tip with the thick end off the back over the tail.
Step 7: Make three wraps of wire holding both colors firmly, keeping them together. Unwrap one of the wires
three wraps leaving the other wire wrapped.
Step 8: Pull the goose biot over the back and rewrap the unwrapped wire being sure to fill the gaps left by
unwrapping. Gently pull the goose biot back towards the tail.
Step 9: Make two wraps forward with the double wires, unwrap the same color as before two wraps, pull the
biot forward and rewrap.
Step 10: Repeat with two wraps until the wire reaches 60% up the hook, make one wire wrap, tie off and clip
the wires, not the biot.
Step 11: Tie in one strand of midge flash where the wire ends, across the top of the shank to form the rear
pair of legs.
Step 12: Dub the thorax with ice dubbing then take two strands of midge flash and tie one on each side of
the shank forming two legs on each side.
Step 13: Pull the remaining biot over the thorax forming the wing case. Secure with thread wraps just
behind the bead. Trim the excess, whip finish, cement, and trim the legs to length.
Morrish's Pickpocket was developed by Ken Morrish of Ashland, Oregon. Ken is a full-time
fly fishing professional. His expertise has led him to become a well respected fly fishing and tying
teacher, a tackle consultant, a top notch published photographer, and environmentalist. He also designs an
extensive line of fly patterns for Idylwild Flies of Portland. In 1999 he started Fly Water Travel,
specializing in exotic, international angling destinations.
My interest in this pattern was peaked by my friend, Bob Claypool, who surprisingly
listed it as one of his favorite summer steelhead flies. According to Bob his success with this small #10
size nymph was amazing. That old adage about big fly, big fish, doesn't hold true for many anglers who have
reached the big ones with Ken's deadly little nymph.
TYING TIPS
Don't be discouraged by the number of steps in the instructions on this one. It is not
complicated, just a little tedious with the wrapping, unwrapping, and rewrapping of the wire. Variations
are as numerous as the number of color combinations you can create with the materials. Brown, olive,
copper, and black seem to be the most popular. Vary the size of the hook for water flow conditions and
depth. The bead, lead and wire give the weight and classic shape. The legs add the movement, and the ice
dub does the attraction duties. So tie some up, give them a test flight and let me know how you do. Thanks
Bob!
Tie One On,
Dan Kellogg (you can contact me at FLYGUY@EZNORTHWEST.COM)