On The Fly
"Fly tying is a school from which we never graduate"
 TYING NEWS
The January meeting of the Southern Oregon Fly Tiers (SOFT) was held on Thursday,
January 27th at the Rogue River Library. There were a record number in attendance
including six new members. Steve Bonner from the Native Run Fly Shop in Grants Pass
was our guest tier. He demonstrated his "String Leech" and "Hot Melt" flies.
Beth Williams won the fly raffle and everyone enjoyed the other demos.
Club volunteers spent part of the day on February 1st putting together the
fly-fishing and tying display in the lobby of the Rogue River Library. Items were
donated by SOFT members and will represent the sport in general.
The next SOFT meeting will be on February 24th at the Rogue River Library. We will have demos, a fly exchange, and lots of fun for all. Please accept our invitation to attend the fourth Thursday of each month.
 PATTERN OF THE MONTH -
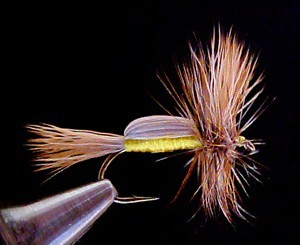
Humpy, Goofus Bug, Wonder Fly or Horners Deer Hair
Hook: Standard dry fly, Mustad 94840.
Thread: 6/0 red, yellow, or green.
Tail: Natural deer hair or moose body hair.
Body: Deer hair or elk hair.
Wing: The tips of the body hair will be tied forward, then back to vertical
to form the wing.
Hackle: Brown and grizzly mixed.
Tying Instructions:
1) Lay a base of thread on the hook shank. Tie in a tail of deer hair or moose body
fibers, with the butt of the fibers extending to the mid-point from the eye to
hook bend. Make the tail length the same length as the hook shank.
2) Select a clump of deer hair with a cross-section thickness of a wooden matchstick
(for a #12 fly) and line up the tips with a hair stacker. The deer hair should be
long enough to extend from the middle of the hook shank to beyond the tail
(remember that this clump of hair is both the body and the wings when folded back).
3) Trim the butts of the deer hair clump to make sure they are exactly at the
center of the hook shank and tie them with increasing tension back and forth from
the middle of the shank to the bend of the hook. Continue this back and forth
wrapping until no remaining deer hair is showing. End with your thread at the
middle of the hook shank.
4) Grab the tips of the deer hair clump and bring it forward, yielding the hump of
the humpy. Twist the clump of hair slightly to bring the fibers together and
tie them down just beyond the point where the butts are secured. Take 2-3 turns
of thread to secure the hair.
5) Fold the tips of the deer hair backward to a vertical position and wrap thread
in front to keep them upright.
6) Use a figure eight pattern with your tying thread to divide the hair-tip wings.
7) Tie in two hackles, a brown and a grizzly of appropriate size, and wrap them
both in back of and in front of the wing. Tie off the hackle and apply cement.
While researching the history and origin of the Humpy for this article, I came across several different accounts about its creation. The first one claims that about 65 years ago some California trout anglers ran out of their favorite clipped deer-hair fly, the Ratfaced McDougle, and having limited tying skills, devised a way of folding the buoyant deer hair over the hook. It was called the Horner Deer Hair Fly at that time in California, after famous tier Jack Horner.
Another account, according to the American Angler (spring 1990), credits the Goofus Bug pattern to Keith Kenyon, a Montana guide and tier, who secretly created it in 1944 for the Firehole River. It's effectiveness leaked out and the demand for that "goofy deer hair fly" bombarded the shops of West Yellowstone. Thus the name Goofus Bug was adopted. Later, this pattern was popularized by Dan Baily of Livingston, Montana. Apparently the fly was first called a Humpy or Wonder Fly in the waters around Jackson Hole, Wyoming.
No matter what it's called or who invented it, the pattern is deadly on big western waters mainly due to it's high profile and because it's virtually unsinkable. There are a number of variations on the basic Humpy theme including: Royal, Yellow, Black, Trude, and Poly Humpy just to name a few. And this fly is not just limited to catching big western trout. According to Dave Whitlock it also works well for bass and panfish. You will find an assortment of Humpys in my fly box not only because they work so well but because they are relatively easy to tie and require no super expensive materials. Tie some up for the upcoming season, then take them on a test flight and let me know how they work for you.
TYING TIPS - Save the Scissors
As far as tying tools are concerned, other than the vise, a good pair of scissors
will probably be your most costly investment. A lot of authors and experts suggest
buying a second, inexpensive pair of scissors for cutting wire, tinsel, hard quills,
etc. because these materials can quickly dull and spring the blades out of alignment.
My suggestion is to buy a small pair of diagonal cutters for cutting your hard
materials. Another tool that can save your good scissors is a leader nipper to cut
all that hard stuff.
Tie One On,
Dan Kellogg (you can contact me at FLYGUY@EZNORTHWEST.COM)