On The Fly
December 2010
"Fly tying is a school from which we never graduate"
TYING NEWS
The Southern Oregon Fly Tyers invite you to attend their meetings the second Tuesday
of each month. The next meeting is December 14, 2010. The meetings start at 6:00 PM, at the Madrone Hill
Mobile Home Park community building near Gold Hill. Bring a friend, come early so you don't miss anything,
and stay late. Tyers need not be experienced, and those with all levels of skill are welcome. Each meeting
a member is encouraged to demonstrate a new or different skill, from simple to difficult. For more
information, call Dan Kellogg at 773-4724.
We'll have two tyers at the December meeting, Mark Teeters and Mike Barnum. Mark is going
to demo the reverse tied wing for steelhead flies, and feature some Ed Haas patterns. He'll deconstruct one
of Mr. Haas' flies to examine his tying methods. Mike will be demonstrating a technique that will allow you
to use a feather that would ordinarily be too large for a particular application. Mike won't be tying a
specific fly, but demonstrating a hackling technique. Bring some pheasant tail and dubbing or similar
materials, if you want to actually tie your own fly.
DIRECTIONS: Take Gold Hill Exit #40, off of I-5 and go west, toward Jacksonville, 1.3
miles, until you reach the brick entrance way to the Madrone Hill Mobile Home Park on the right. You’ll
pass a golf course parking lot on Your left shortly after leaving the freeway. After you turn right into the
mobile home park, proceed to the community building which is located about 100 yards ahead on the left. The
address is 8401 Old Stage Rd. Please park your vehicle on the bare dirt in the parking lot to avoid the
wooden septic covers in the grass.
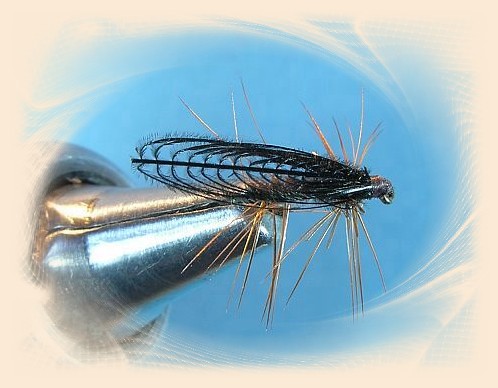
PATTERN OF THE MONTH - Little Black Stonefly

Hook: Daiichi 1170, Standard dry, size 16 - 20
Thread: 8-0 black.
Tail: Moose body.
Abdomen: Fine & Dry, black or black/brown.
Wing: Grizzly or black hackle feather.
Hackle: Black CDC.
Head: Dubbing.
Antennae: Moose body.
Tying Instructions
Step 1 Mash the barb and mount the hook in the vise.
Step 2: Start the thread two eye widths behind the eye and lay down an even thread base to just above the
hook barb.
Step 3: Select two moose body hairs, measure them 2/3 the body length, and tie them in just above the hook
point. Split the hairs with a couple wraps of thread. Trim the butts 2/3 the body length and tie down on top
of the hook with spiral wraps and return thread to the base of the tails.
Step 4: Wax the tying thread and twist a sparse amount of dubbing onto it. Wrap the dubbed thread into a
thin body up to the 2/3 point on the shank. Remove excess and tie off.
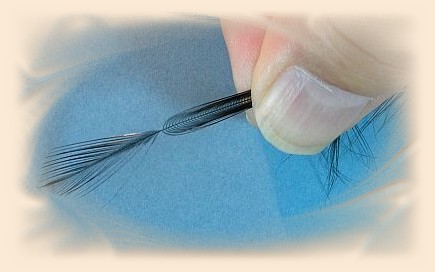
 Step 5: Select a hackle feather with barbs 1 1/2 times the hook length. Hold the feather flat in your left
hand with the shinny side up. With your right fingers pinch the feather top and bottom along the stem. With
your left hand slowly draw the hackles through the right fingers, preening the barbs back toward the base
of the feather. Stop pulling when about 1/4" of preened barbs extend beyond the right fingertips. Position
the feather with your right hand on top of the hook shank just in front of the body. Using your left hand
take two loose wraps over the feather at the mounting point. Continuing to hold the feather in your right
fingers, grasp the tip of the feather in your left hand, and draw it carefully beneath the thread wraps
until the wing is the desired length and on the very top of the hook shank. Secure in place with additional
thread wraps. Clip off the excess material and bind down the butts. Clip away the feather tip at the rear
of the wing.
Step 6: Select a CDC feather, tie in by the tip just in front of the wing. Wrap the feather forward 2-3
turns stroking the fibers rearward at each half turn. Tie of and trim excess. Take two turns rearward over the
CDC fibers forcing them back over the wing slightly.
Step 7: Apply a small amount of dubbing to the thread and wind in front of the CDC to form a broad head.
step 8: Select two more moose body hairs, tie one on each side of the head about the same length as the
tails. Secure with thread wraps and trim excess.
Step 9: Whip finish and cement. If desired, trim the CDC legs to length.
This month's article is the third installment in a 3-part series on winter flies for the
Rogue River, a mayfly, a caddis, and a stonefly. All three offer opportunity for the fly fisherman during
the months that most of us hibernate and tie flies to fill our boxes for the next season. Unfortunately for
the trout hibernation is not an option. Fortunately there is plenty of aquatic life to feed on, mostly
below the surface. The Little Black Stonefly, or Little Brown as it is called in some areas, can offer some
exciting winter dry fly fishing. These rarely intense hatches are overlooked by many fly anglers but not by
the trout. In the late winter and early spring when water temperatures reach below 40 degrees, the nymphs
crawl toward the shoreline onto rocks or other objects protruding from the water, hatch into adults then
mate in small swarming groups. The females immediately head back to the water to release their eggs quickly,
usually sporadically throughout the day depending on overcast and low light levels. This egg depositing is
when the adults are available for enthusiastic trout to eat.
Look carefully for the presents of The Little Black Stoneflies on streamside bushes, trees, and snow banks.
Unlike mayflies, the stones live longer, having mouthparts for eating and drinking, staying available
longer for the fish. They are clumsy, slow, and erratic in flight. At rest the wings are folded flat over
their back with two pronounced short tails. This month's pattern incorporates a unique reverse hackle down
wing, or "wonder wing". The legs, made of CDC feather, add floatation, movement and life.
TYING TIPS
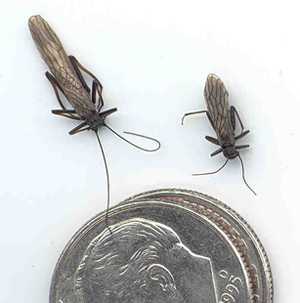
 Vary the small size to match the naturals. Color can vary from black to dark brown. Keep
the body slender. You can see by the picture of the naturals, they are small and thin. The wing can be
fashioned from rooster neck or hen hackle in grizzly or black. Notice the broad shaped head compared to the
rest of the body. Don't let step 5, in the tying instruction, discourage you. The wing is tricky at first,
and hard to describe, but once practiced, becomes a piece of cake. This great technique can be used for
many great patterns in the future. So tie some up, give them a cold weather test flight, and let me know
how you do.
Tie One On,
Dan Kellogg (you can contact me at FLYGUY@EZNORTHWEST.COM)