On The Fly
"Fly tying is a school from which we never graduate"
TYING NEWS
The RFF will again be offering fly tying classes after the first
of the year. Dale Heath will be teaching the beginners, Morris Fruitman
will enlighten the intermediate group, and I will push the advanced
people to higher levels of techniques. All three levels will start on
Monday, January 14th at the Medford Library and run for six consecutive
nights. No charge for the lessons and materials are furnished by RFF.
Students will provide their own vise and tools. This is a great time to
encourage kids and grandkids to get started. Sign-up sheets will be at
the December RFF meeting or you can contact me on-line. We can
accommodate only twelve students in each class, so let me know ASAP if
you want to enroll.
The Southern Oregon Fly Tiers met Tuesday, December
11th at the Madrone Hill community building near Gold Hill. Novice and
experienced tiers alike are encouraged to drop by the second Tuesday of
each month for a fun evening. We have plenty of room for everyone. At
our last meeting, we continued our monthly series of guest tiers in a
tie-along format. Our guest, Mark Teeters, demonstrated a series of AP
Nymphs developed by Andre Puyans. In January we have scheduled Bob
Quigley to show us one of his signature flies. If you are interested in
this educational experience, contact me and we will add your name to our
e-mail list. We can let you know who, when, and what materials to bring.
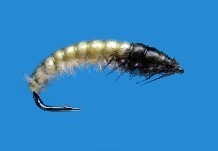
 PATTERN OF THE MONTH - The Caseless Caddis
Hook: TMC 200R or equivalent, size 12-24.
Underbody: Lead wire, 0.015-in. dia.
Thread: 8/0 black.
Ribbing: Monofilament, 0.020-in. dia.
Back: Transparent Flexibody or Thin Skin.
Body: Olive or golden olive synthetic dubbing.
Thorax: Mink dubbing.
Head: Black thread.
Tying Instructions:
1) Start the thread and lay down a thread base on the shank to just
above the barb.
2) Start the lead wire just above the barb and wind the wire forward in
close tight turns to the thread tie-in point. Now, reverse directions
and wind a second layer of 5-6 wire wraps towards the rear to form the
thorax shape. Trim the lead and secure it with thread wraps and cement.
3) Tie on the mono ribbing on the shank above the barb, and then tie on
the back material.
4) Form a dubbing loop and insert the dubbing somewhat sparsely, twist
the loop to form a rope, and then wrap the rope forward to the back of
the thorax. Tie off the rope and trim it.
5) Form a shorter dubbing loop, insert the mink dubbing, twist the loop
to form a rope and cover the thorax area. Tie off and trim.
6) Pull the back material forward over the top of the body and thorax.
Tie off and trim.
7) Wind the mono forward in about 10-12 even turns to form the segments.
Tie off and trim.
8) Form a nice tapered head. Whip-finish the thread and apply cement.
At last month’s RFF meeting we were treated to an informative program called De-bugging Entomology, by Rick Hafele. At the November SOFT meeting John MacDiarmid enlightened us on the caddis life cycle in the Rogue River. Examine the stomach contents of any trout caught any time of day, any time of year, in any water and the chances are you would probably find caddis larvae. Examine just about any submerged rocks or sticks on just about any body of fresh water, and chances are you will find caddis larvae. A large percentage of caddis form cases out of debris or sand from the bottom. But there is also a large group of caddis that are free swimmers (caseless).
This month’s pattern, The Caseless Caddis, was developed in 1988 by Hans van Klinken from Holland. The soft back material and mono ribs create an excellent segmented appearance, while the curved hook represents the natural appearance of a caddis larva that has been dislodged and disoriented in the drift. The Caseless Caddis has been proven to be an excellent pattern for beginners. It is easy to tie and extremely easy to fish with. In clear water you can fish the pattern by sight. In deeper or off-color water you can use a strike indicator. So tie some up, give them a test flight, and let me know how you do.
TYING TIPS
Mink dubbing is very difficult to find packaged at
your local fly shop so I make my own. Today it is fairly easy to find a
used mink hat, stole, or coat at garage sales or thrift stores. I just
cut the fur off the skin, with the guard hairs included, into my little
coffee grinder and mix it for a few seconds. After the thorax has been
dubbed, be sure to pick out those guard hairs to form the legs of the
caddis. You can easily vary the size and color of this pattern to match
any species of caseless caddis you encounter.
Tie One On,
Dan Kellogg (you can contact me at FLYGUY@EZNORTHWEST.COM)