On The Fly
"Fly tying is a school from which we never graduate"
TYING NEWS
The Southern Oregon Fly Tiers met Wednesday, June 14th at the library in Gold Hill. There was a fly raffle and several talented members provided tying demonstrations. A lot of valuable knowledge was exchanged. Several members voted to donate flies to the Casting for Recovery program coming up this fall. Our next meeting will be on July 12th. Please join us the second Wednesday of each month for more fun and the sharing of the art. Kids and Grandkids are welcome.
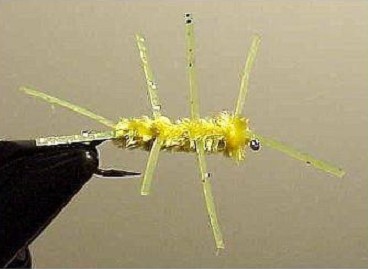
 PATTERN OF THE MONTH - Girdle Bug
Hook: 2X long, sizes 2-12.
Weight: Optional) Brass or tungsten bead.
Thread: Black 6/0.
Tail: One pair of rubber legs,
Body: Solid color or variegated chenille.
Rib: (Optional) Fine silver or gold wire.
Legs: Two pair of rubber legs for the no-bead-head version & three pair of legs for the bead-head
version.
Antennae: One pair of rubber legs (for the no-bead-head version).
Tying Instructions:
1) Start the thread one eye length behind the eye. This is your marker for starting a neat tapered head.
Wind the thread back to the bend of the hook.
2) Select a piece of rubber leg material about two times the length of the shank. Double the material in
half and secure it at the fold on top of the hook with several wraps of thread to form a V-shaped tail
facing rearward.
3) At this location, tie in a piece of your chenille then advance the thread to the position for the first
set of legs.
4) Wrap the chenille forward to the hanging thread and tie-off. Pull the chenille back, out of the way, and
then tie in the set of legs perpendicular to the shank, rather then swept backwards.
5) Advance the thread forward to the position for the second set of legs, then repeat Step 4.
6) Advance the thread forward to the next leg position (if you are using a bead head) or to the position
for the antennae (if you are not using a bead head). Wrap the chenille forward to the hanging thread and
tie-off.
7) If you are using a bead head, secure the third set of legs right behind the bead and perpendicular to
the shank, then whip finish and apply cement. If you are not using a bead, secure the last set as
forward-facing antennae, then form a neat tapered head, whip finish, and apply cement.
The Girdle Bug is widely known and used in the big waters of the Western United States
where it was developed. This fly has saved the day for many anglers on some of the toughest waters of the
region. Trout are the primary quarry, but the pattern is effective on steelhead, smallmouth bass and other
pan fish. The name of this fly is based on an early source of the rubber for the legs. The Girdle Bug is
perhaps the secret pattern of at least a few local experts on the famous Grand Ronde River. An article from
2004 claims that one of these locals took fourteen steelhead in under one hour on a short stretch of the
Ronde. This is one of many testaments to the effectiveness of this fly. Try some when you fish the Grand
Ronde.
How can a wary fish distinguish a live underwater fly from a dead (or fake) fly that is
being carried along the current or stripped in by a fly fisher? One answer might be legs that are moving in
life-like fashion. Soft hackle used on underwater flies is intended to create that illusion of life. The
soft hackle from partridge or quail, tied long and flowing, does the job pretty well. These and other
natural materials have been used for decades to add movement to the appendages of the fly. Man-made leg
material, commonly called rubber legs, is thought by many to be better for fly legs, especially on
imitations of big insects like stoneflies and dragonflies. It is more available, generally less expensive,
easier to tie with, can be made in a multitude of sizes and colors, and is almost indestructible. The
newest legs are made of silicone and contain sparkles, speckles, stripes and dots.
Why are rubber legs so popular and effective? Unlike barbules of a feather, the synthetic
strands do not taper and therefore have a lot of weight or mass far out from their point of attachment. That
mass tends to be very unstable and it moves almost on its own. That may not be scientifically accurate but
itís my theory. So tie some up, give them a test flight and let me know how you do.
TYING TIPS
By varying the size and color of this fly, you can have a pattern that is effective for
many species. Try yellow in a size 4 or 6 for bass and size 10 or 12 for bluegill. If you donít have
variegated chenille, tie in two strands of different colors, twist them together and you get the same
result. I like to tie in the legs a little long and then trim them to the right proportions when the fly is
completed and still in the vise. That way you can concentrate on position and angle while the fly is under
construction.
Tie One On,
Dan Kellogg (you can contact me at FLYGUY@EZNORTHWEST.COM)