On The Fly
"Fly tying is a school from which we never graduate"
TYING NEWS
The Southern Oregon Fly Tiers met Wednesday, January 10th
at the library in Gold Hill. There was a fly raffle and tying demonstrations
by several talented members. We encourage novice and experienced tiers alike
to drop by for a fun evening. The next meeting will be on February 14th. The
members are watching the library funding issue closely and how it will
affect our meeting place in the future.
With the arrival of 2007, many local tiers are already
preparing for the upcoming Northwest Fly Tiers Expo on March 9th and 10th.
There will be up to 300 tiers at this two-day event and there will be vendor
booths featuring the latest tying and fishing gear. Ask anyone who has ever
attended this event and they will tell you it’s worth the trip.
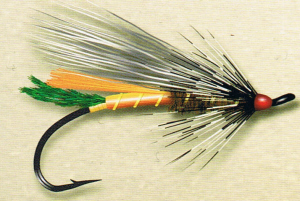
 PATTERN OF THE MONTH - Rusty Rat
Hook: Standard salmon/steelhead.
Thread: Red 6/0.
Tag: Oval gold tinsel.
Tail: Peacock sword.
Body: Rear half of orange-yellow floss,veiled
above by one strand of floss extending to
the middle of the tail. Front half of peacock herl.
Rib: Oval gold tinsel.
Wing: Grey fox guard hairs.
Collar: Soft grizzly hackle.
Cheeks: Jungle cock (optional).
Head: Red thread.
Tying Instructions:
1) Start the thread two eye-lengths behind the eye. This is the start of the
thread base for the body material and this location is the marker for the
wing tie-in point. Wind a thread base back to just above the point of the
hook.
2) Tie in the tag material, make 3-4 turns, tie-off, leaving the tag end for
the rib.
3) Tie in the peacock sword as the tail. Advance the thread forward on top
of the sword butts to where the floss body ends.
4) Tie in the floss at this point, binding it down on top of the shank to
the front of the tag. Wind the tying thread forward to the floss tie-in
point. Wind the floss forward in close, flat wraps, and then tie-off the
floss.
5) Wrap the ribbing tinsel forward over the floss in four equal turns. Tie
off the ribbing tinsel and pull the tag end of the floss back toward the
rear of the hook shank. Tie back on the floss and trim it to length at the
middle of the tail. Trim the tag ends of the tinsel and sword.
6) Tie in four peacock herls, form a dubbing loop, advance the thread to the
marker, twist the herls in the loop, wind the peacock rope forward to the
marker and tie it off.
7) Select a bunch of Grey Fox guard hairs, remove the under fur, and tie in
the guard hairs with tight turns at a low angle over the body.
8) Select a soft grizzly feather and tie it in at the base of the wing. Form
the collar by winding the feather forward while stroking it rearward. Tie
off the feather and trim excess. Form a neat head with the red thread, whip
finish and apply cement.
The “Rat” series of Atlantic Salmon hair wing patterns was
originated by Roy Angus Thompson in 1911 and his initials R.A.T. are the
inspiration for the name. This is another series of flies that have migrated
west with proven results on our Pacific steelhead. Variations of the
original fly patterns have been introduced by other tiers, in fact the most
popular and successful pattern of the series, the Rusty Rat, was developed
by J.C. “Clovie” Arseneault.
Even though there are a number of components and tying
steps, the Rusty Rat is not difficult to tie. I chose this pattern to
introduce new techniques and disciplines to those of you who follow my
column. These techniques will apply to many of the more complex flies you
may attempt in the future. And for those who just want to produce a killer
pattern for steelhead, tie some up, give them a test flight, and let me know
how you do.
TYING TIPS
Floss can be difficult to use for a variety of reasons.
Having it flair out when being applied and getting it to lie flat are two of
the biggest challenges. The further away from the hook while you wrap the
floss, the more it will try to splay out. So hold it as close as possible
with the filaments parallel. If you apply the floss with a bobbin you will
be adding a twist with each turn. Compensate for this by holding the bobbin
perpendicular to the hook shank as you wind. For a smooth, flat look make
sure you untwist the floss after its tie-in, keep a steady tension, and
concentrate on laying the wraps right next to each other.
If Grey Fox is not available you may substitute Grey
Squirrel. Be sure to remove the under fur to reduce bulk. Try to get into
the habit of untwisting or flattening the thread before you tie in the guard
hair, and keep a steady tension on the thread. A flat thread and a little
head cement on the butts of the guard hair will help hold them in place.
Tie One On,
Dan Kellogg (you can contact me at FLYGUY@EZNORTHWEST.COM)