On The Fly
"Fly tying is a school from which we never graduate"

TYING NEWS
The Southern Oregon Fly Tiers met Wednesday, January 11th at the library in Gold Hill. There was a fly raffle and fly challenge along with tying demonstrations. We had several new tiers drop by for a fun evening. A lot of valuable knowledge was exchanged at no charge. The next meeting will be on February 8th. Join us the second Wednesday of each month for more fun and the sharing of the art.
RFF will again sponsor beginner and intermediate fly tying classes beginning Monday, February 6th for six consecutive weeks. Classes will be held at the Medford Library, from 6:30 to 9:00 p.m. Tools and thread will be required, but the tying materials will be furnished. We can accept no more than 12 students per class. Sign up sheets will be at the next RFF meeting or call me to register.
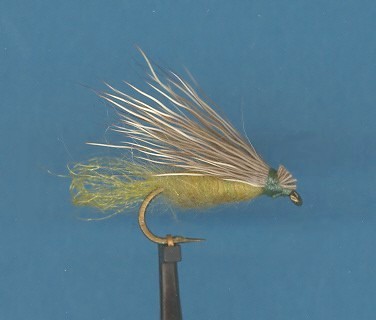
 PATTERN OF THE MONTH - X-Caddis
Hook: Standard dry fly, sizes 12-20.
Thread: 6/0 or 8/0 to match body.
Tail: Zelon: amber gold or caddis gold.
Body: Dubbed Antron: tan, brown, olive, or
black to match natural.
Wing: Deer or Elk hair.
Head: Tying thread.
Tying Instructions:
1) Start the thread near the bend of the hook and wind the
thread forward to within two eye-widths of the eye.
2) Separate out a small quantity of Zelon. Use about half
the normal amount (the material will be doubled onto itself).
Cut it about three-shank-lengths long for easy handling.
Secure it with thread wraps where the thread was left
hanging. Twist the material one turn clockwise, and while
holding the twisted material, fold it back onto itself
forming a loop (the bubble shuck) a little less than a
shank-length long; secure the loop with thread wraps and
trim excess material.
3) Twist the loop tightly clockwise, and while holding the
twisted loop, wind the thread toward the bend securing the
loop to the top side of the hook. Stop the thread at the
bend.
4) Dub the thread and form a body by winding the thread
forward to the thread marker.
5) Lay down a thread base for the wing area on the remaining
bare hook shank.
6) Select a portion of Deer or Elk hair and place it on top
of hook with tips even with the body length. Secure the wing
with each wrap placed to the rear of the first wrap.
Release the thread tension slightly as you wind rearward to
prevent over flaring and to make the hair lay down along
the body.
7) Pick up the butts and put 3-4 wraps of whip finish
tightly against the wing.
8) Trim the butts leaving a small stub.
9) Apply cement to insure that the wing stays in place.
The X-Caddis was originated in 1980 by Craig Mathews of Blue Ribbon Flies in West Yellowstone, Montana. Early versions were dubbed with beaver bodies but now most tiers use Antron because of its buggier appearance. This three-season pattern will take fish during the day when there is no hatch, during a hatch, and during the evening rise. It is fished most often drag free using a floating line. Some anglers put floatant only on the wing to imitate a cripple hanging in the surface.
The Zelon shuck represents the sheath that protected the insect as it moved upward to hatch. The emerging caddis leaves behind the shuck that is nearly transparent so the tail should be very sparse. Too much material will make the shuck stiff and opaque. On the original pattern the tail was cut to length straight and blunt. The pattern above incorporates an improved tail called the bubble shuck, giving a more natural elongated bubble appearance. Itís a simple tie using only three materials. Tie some up for the next season, give them a test flight and let me know how they work.
TYING TIPS - Loose Wings
Many tiers have been frustrated with
their elk or deer hair caddis wings. After only a few fish,
the wing comes loose or twists around the hook shank. The
problem is that thread wrapped simply over the hair butts is
not adequate to hold the wing in place. There is a solution,
but it is not placing 29 more wraps of thread around the
hair. The solution is placement of thread to apply the most
force.
A flat thread base made with untwisted thread is needed at the wing location. When you mount the wing you should secure it directly on top of these forward-most flat wraps with a few wraps of well-twisted thread. The base thread on the hook acts as a friction or anchor point for the wing. By twisting the thread to bind the wing down you add strength and reduce the diameter, so it bites deeper into the wing, thus pinching the hair onto the base thread tighter.
Tie One On,
Dan Kellogg (you can contact me at FLYGUY@EZNORTHWEST.COM)